

My little Cannon is a cute Bear cub scout and this week he had the Blue and Gold Banquet. Each scout was asked to bring a decorated cake with the theme “The Great Outdoors”. Cannon and I had so much fun creating this campfire cake and it was surprisingly easy! To keep the process simple my nine year old and I used a cake mix, and a can of frosting! Making the fire was the best part! We unwrapped lots of cinnamon and butterscotch candies, placed them in a gallon size freezer bag and Cannon crushed them using a meat tenderizer (the flat side–but you could also use a rolling pin). So fun! We sprinkled them in a swirling pattern on a silpat lined cookie sheet and melted them in the oven. It only took about 10 minutes to melt and another few minutes to cool and solidify again.

We used a toothpick to make some additional swirls while the candy was liquid. Then once it was cool, we cracked it with the handle of a butter knife. Cannon put it all together creating this camp fire cake mostly himself, with very little help from me! So fun and so easy!
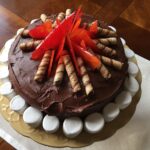
The “fire” looks so cool with the little “log” cookies. I am thinking this would be fun to make for a backyard movie night or party. We had so much fun putting this camp fire cake together that I am sure he will want to do it again someday!

I originally saw this idea on my friend instagram feed and logged it away in my memory. When Cannon came home with the assignment, I showed him the picture and he of course LOVED it! So thank you Holly for the inspiration! It was perfect for my little cub scout and we had a blast making it together!

Campfire Cake
Description
Super cool cake with candy fire and cookie logs!
Ingredients
- Cake mix or your favorite cake recipe *see recipe links above
- Can of chocolate frosting or make your favorite chocolate frosting recipe *recipe link above
- Small bag of yellow butterscotch candies
- Small bag of red cinnamon candies
- Canister of rolled wafer cookies (such as Pepperidge Farm Pirouette® Rolled Wafers)
- Large marshmellows
Supplies needed:
- Silpat baking liner or Parchment paper
- Baking sheet
- Meat tenderizer tool or heavy rolling pin
- 2–3 zipper sandwich bags
- Toothpicks or bamboo skewers
Instructions
- Make your favorite cake using 8 0r 9-in. round cake pans to make 2 layers. Bake layers according to your recipe or directions on the box and set aside to cool.
- Use a can of frosting or make your own and frost cake after it has cooled. Use an offset spatula to create loose swirls on the sides and top of the cake.
- Preheat oven to 375˚F. Unwrap butterscotch candies and put them into a sandwich bag. Press out all the air and seal bag closed. Crush candies with the meat tenderizer or rolling pin until they’re pea-sized or smaller. Repeat this process with a separate sandwich bag of cinnamon candies.
- Line a baking sheet with a nonstick silpat liner or parchment paper. Pour the crushed candy in a circler pattern with the two colors side by side. I put them in a swirly pattern.
- Place baking sheet in oven and bake for about 5 to 7 minutes until candy liquefies. Keep an eye on the candy as it melts—you want it melted but not bubbling.
- When the candy has melted, remove the baking sheet from the oven and use a toothpick or the end of a skewer to swirl them a little bit together. Allow to cool and harden and then hit with the bottom of a butter knife to create shards of candy for the fire.
- Cut rolled wafer cookies in half and place them around shards of candy on top the cake to create the campfire.
- Place large marshmellows around the base.
- Enjoy!
Recipe Source: Inspired by my friend Holly, but I found one similar here on Hallmark Ideas
It’s so fun to make too!!
I love ❤️ this idea!
Ha! Good question—it is a little tricky but we managed to cut it like a normal cake and made sure everyone got some “fire”! Enjoy!!
Looks great, and my scout and I are going to make it this weekend! But HOW did you cut/serve it??
Dear Olivia,
I am SO sorry that I did not see your sweet comment earlier! My son got married and I took a little break from my blog! I hope you used the recipe for your project and you can ALWAYS always mention my website! I love it when people share the site with others. Sorry again that I did not respond sooner! I hope your camp fire cake turned out great and you had fun making it! Have a great summer! xoxo
Hello Mrs. Melanie!
I have a school project to do, and I’d like to use parts of the recipe. I’d like to use the idea of the jolly rancher’s being melted for the fire. I would credit you of course! I would also like to have a little information about the website, which I found on the about page. I was wondering if I could mention you in it!
Please get back to me soon,
Olivia Reid (7th grade Florida)
Hi Molly,
I have never made it more than a couple of hours ahead of time but I would assume you would be fine to make it a day or two ahead. Just be sure it is fully cooled before storing. I can see if the it was put in a bag while still warm–it would turn sticky. Hope that helps! Good luck!
How far in advance can I make my fire candy?
So cool!!!! Love the cake and that cute scout cannon!
So cool!!!! Love the cake and that cute scout cannon!